
Kubernetes service discovery is one of those topics that generates confusion and questions everywhere I go. So here’s my attempt at a definitive guide to Kubernetes service discovery.
I’ll split the article into two sections:
- Networking background
- Kubernetes service discovery deep dive
The networking background section fills you in on everything you’ll need in order to understand the detail of service discovery. It’s pretty basic, so if you already know your stuff, feel free to jump straight to the deep dive section.
One more thing before getting into it… it’s gonna be long! But it’s got everything you’ll ever need to know, plus a bit more 😀
Some Kubernetes networking basics
To get your head around Kubernetes service discovery you’ll need to understand that:
- Kubernetes applications run inside of containers, which run inside of Pods
- Every Pod is attached to the same large flat IP network called the Pod network (usually a VXLAN overlay)
- Every Pod has its own unique IP address that is fully routable on the Pod network
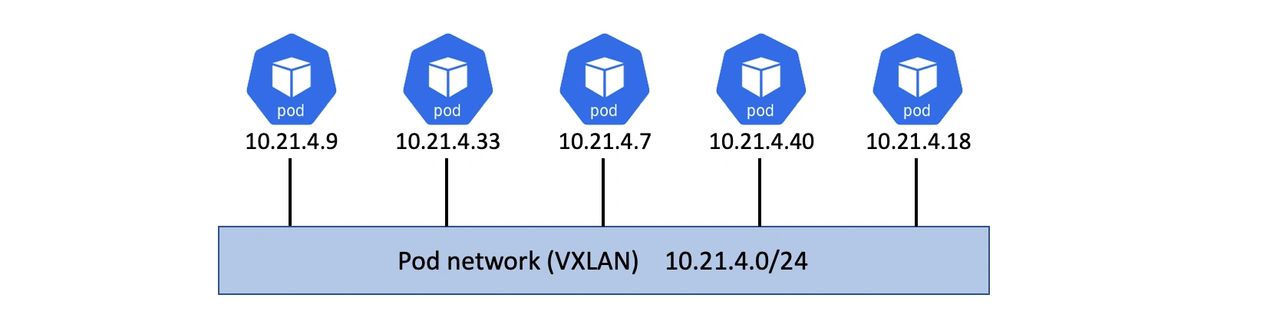
These three things combine so that every application (and application component/service) can talk directly to every other application without the need of any networking magic such as network address translation (NAT).
Dynamic networks
As you scale applications up, new Pods with new IPs are added to the Pod network. As you scale applications down, old Pods with old IPs are deleted. This causes a lot of churn.
The same is true for rolling updates and rollbacks. Both operations add new Pods with the new versions of the application and terminate old Pods with old versions of the application. The new Pods add new IPs to the Pod network and the terminated Pods remove existing IPs.
Without help, every application service would need to monitor the network and maintain a list of healthy working Pods. That would be a royal pain in the ****, plus, coding every application service with this logic would be inefficient. Fortunately, Kubernetes has an object that does this for you. It’s called….. a Service.
> Now then… calling this object a “Service” was a crap idea as we already use the word “service” to refer to an application process or component. So now we have at least two meanings for the word service. Service with a capital “S” is the Kubernetes object that we’re about to describe, service with a lower-case “s” is an application process or component. It’ll become clear pretty soon.
It’s also worth noting that Kubernetes performs IP address management (IPAM) to keep track of used and free IP addresses on the Pod network.
Anyway…
Services bring stability
A Kubernetes Service object creates a stable network endpoint that sits in front of a set of Pods and load-balances traffic across them.
You always put a Service in front of a set of Pods that do the same job. For example, you could put a Service in front of your web front-end Pods, and another in front of your authentication Pods. You never put a Service in front of Pods that do different jobs.
Clients talk to the Service and the Service load-balances traffic to the Pods.
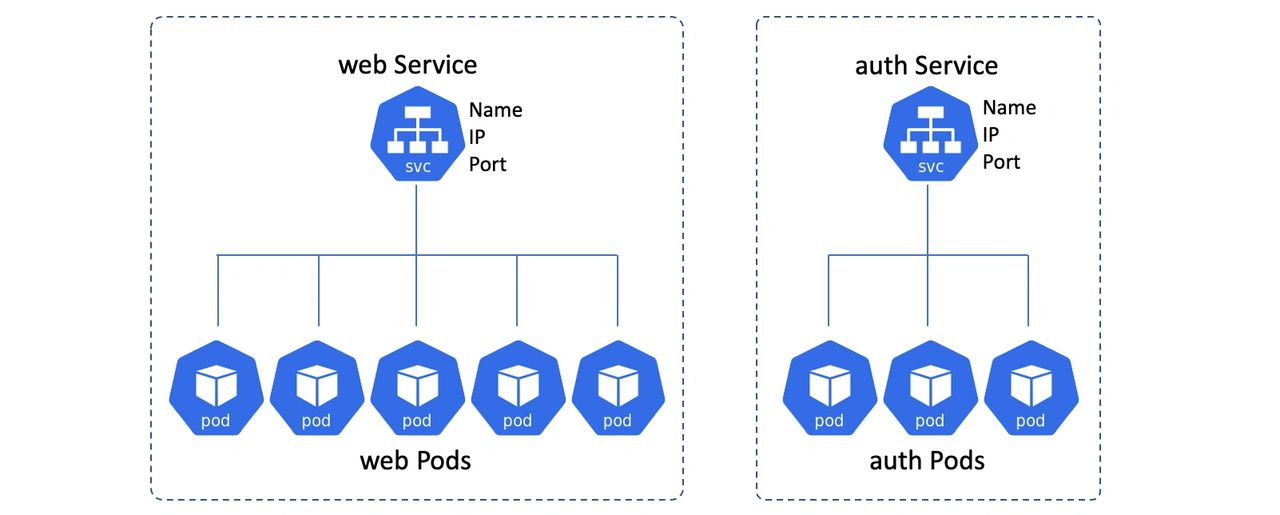
In the diagram above, the Pods at the bottom can come and go as scaling, updates, failures, and other events occur and the Services keep track. However, the name, IP and port of the Services will never change.
Anatomy of a Kubernetes Service
It’s useful to think of a Kubernetes Service as having a front-end and a back-end:
- Front-end: name, IP, port that never change
- Back-end: Pods that match a label selector
The front-end is stable and reliable. This means the name, IP and port number are guaranteed to never change for the entire life of the Service. The stable nature of the Service front-end also means that you do not need to worry about stale entries on clients that cache DNS results for longer than the standards recommend.
The back-end is highly dynamic and will load-balance traffic to all Pods in the cluster that match the set of labels the Service is configured to look for.

Load-balancing in this situation is simple L4 round-robin load-balancing. This works at the “connection” level where all requests over the same connection go to the same Pod. This means two things:
- Multiple requests from the same browser will always hit the same Pod. This is because browsers send all requests over a single connection that is kept open using keepalives. Requests via tools like curl open a new connection for each request and will therefore hit different Pods.
- Load-balancing is not aware of application layer (L7) concepts such as HTTP headers and cookie-based session affinity.
Recapping the intro stuff
Applications run in containers, which in turn run inside of Pods. All Pods in your Kubernetes cluster have their own IP address and are attached to the same flat Pod network. This means all Pods can talk directly to all other Pods. However, Pods are unreliable and come and go as scaling operations, rolling updates, rollbacks, failures and other events occur. Fortunately, Kubernetes provides a stable networking endpoint called a Service that sits in front of a collection of similar Pods and presents a stable name, IP and port. Clients connect to the Service and the Service load-balances the traffic to Pods.
Now let’s talk about service discovery…
Kubernetes Service Discovery DEEP DIVE
There’s two major operations that relate to service discovery:
- service registration
- service discovery
Service registration
Service registration is the process of registering a service in a service registry so that other services can discover it.
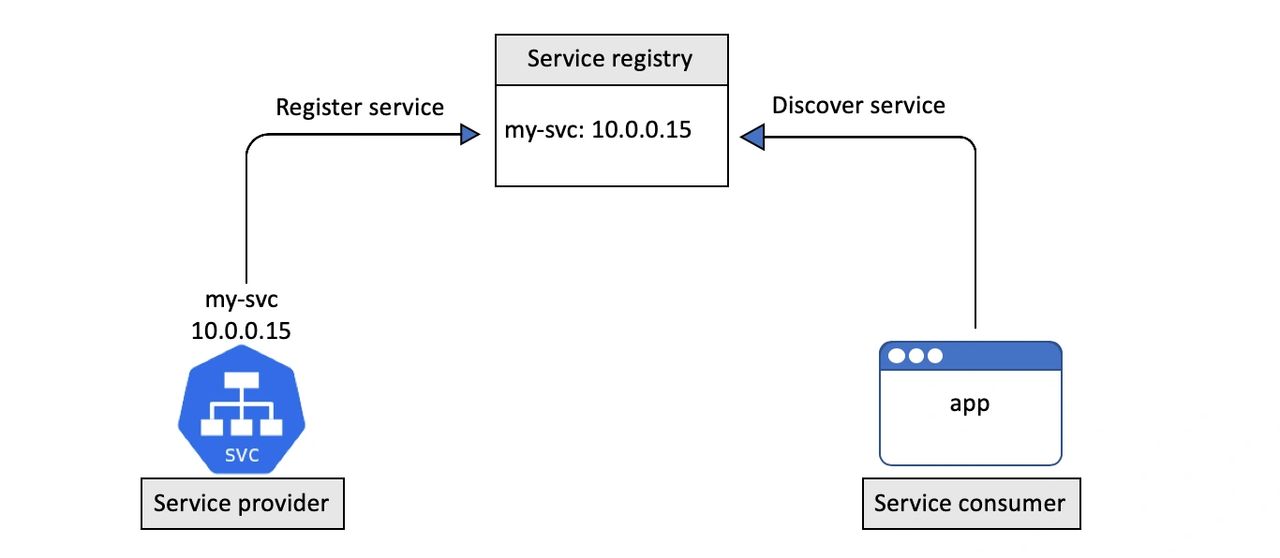
Kubernetes uses DNS for the service registry.
To enable this, every Kubernetes cluster operates a well-known internal DNS service that runs as a set of Pods in the kube-system Namespace. We usually call this the “cluster DNS”.
Every Kubernetes Service is automatically registered with the cluster DNS.
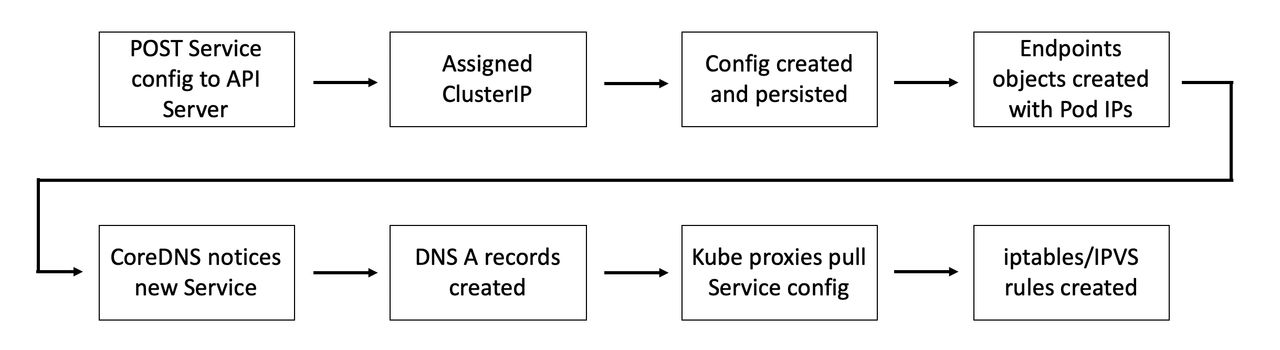
The registration process looks like this:
- You POST a new Service definition to the API Server
- The request is authenticated, authorized, and subjected to admission policies
- The Service is allocated a ClusterIP (virtual IP address) and persisted to the cluster store
- The Service configuration is disseminated across the cluster (more on this later)
- The cluster’s DNS service notices the new Service and creates the necessary DNS A records
Step 5 is the secret sauce in this process. The cluster DNS service is based on CoreDNS and runs as a Kubernetes-native application. This means that it knows it’s running on Kubernetes and implements a controller that watches the API Server for new Service objects. Any time it sees a new Service object, it creates the DNS records that allow the Service name to be resolved to its ClusterIP. This means that Services don’t have to care about the process of registering with DNS, the CoreDNS controller watches for new Service objects and makes the DNS magic happen.
It’s important to understand that the name registered with DNS is the value of metadata.name and that the ClusterIP is dynamically assigned by Kubernetes.

Once a Service is registered with the cluster’s DNS it can be discovered by other Pods running on the cluster…
Endpoints objects
Once the front-end of the Service is created and registered with the service registry (DNS) the backend needs building. This consists of a list of Pods that the Service will load-balance traffic to.
It’s vital that this list of Pods is up-to-date.
A Service has an attribute called a label selector. This is a list of labels that a Pod must have if the Service is going to send traffic to it. It’s the combination of the Service’s label selector and a Pods labels that determine if the Pod will receive traffic from the Service. See the diagram below.
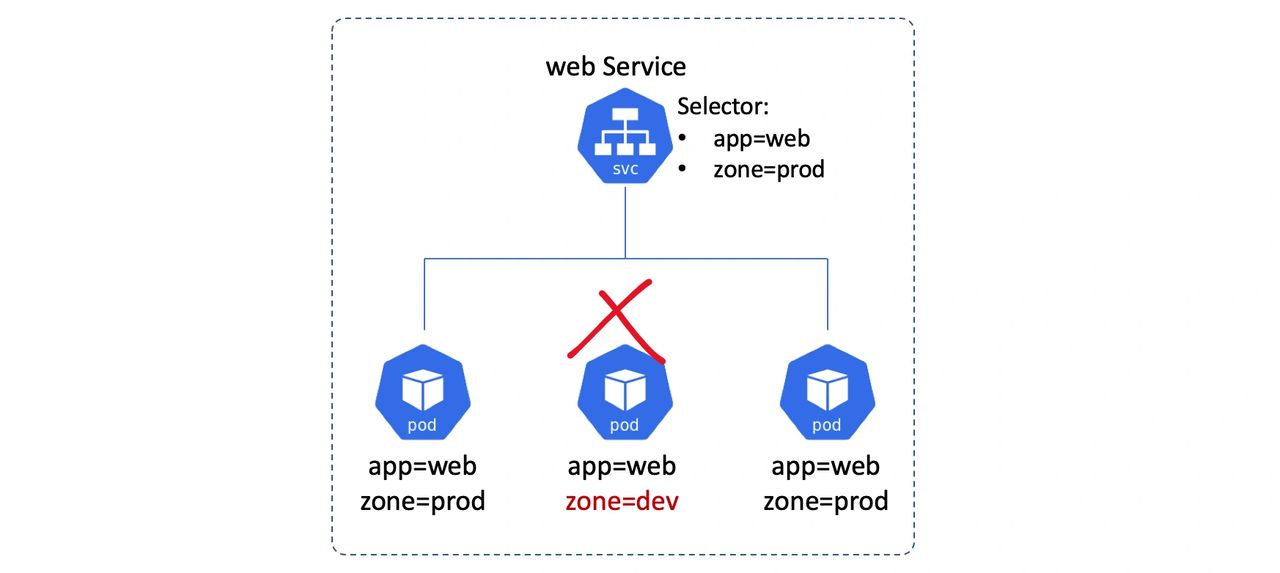
Kubernetes automatically creates an Endpoints object for every Service. The job of this Endpoints object is to hold a list of Pods that match the Service’s label selector and will therefore receive traffic from the Service.
The image below shows a Service that will select on two Pods. It also shows the Endpoints object associated with the Service and that it has the IPs of the two Pods that match the Service’s label selector.

We’ll refer back to Endpoints objects when we explain how the network forwards traffic intended for the ClusterIP to individual Pod IPs.
Service discovery
Let’s assume we’ve got two application services on a single Kubernetes cluster — my-app and your-app. The Pods for my-app sit behind a Kubernetes Service called my-app-svc and the Pods for your-app sit behind another Kubernetes Service called your-app-svc.
Both are registered with DNS as follows:
- my-app-svc: 10.0.0.10
- your-app-svc: 10.0.0.20

For service discovery to work, every Pod needs to know know the location of the cluster DNS and use it. To make this work, every container in every Pod has its /etc/resolv.conf file configured to use the cluster DNS.
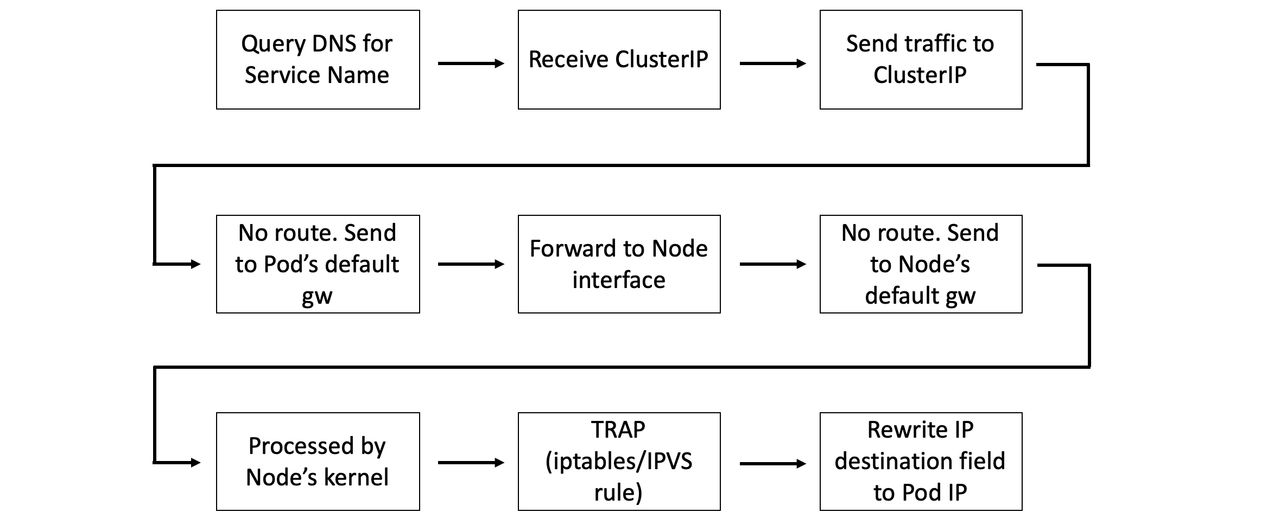
If Pods in my-app need to connect to Pods in your-app they perform a DNS query against the name your-app-svc. Assuming they don’t already have an entry in their local DNS resolver cache they will send the query to the cluster DNS. This will resolve your-app-svc to the ClusterIP (VIP) and port of the Service.
> For this to work, my-app needs to know the name of the Service is it talking to.
At this point, the Pod from my-app has an IP address to send traffic to. However, this is a virtual IP (VIP) that requires more magic to happen so it can reach a Pod.
More network magic
Once a Pod has the ClusterIP of a Service, it attempts to send traffic to that IP address. However, this ClusterIP is on a network that we sometimes call the service network. This network is a bit special as there are no routes to it.
Because there are no routes to it, all containers send traffic for these addresses to their default gateway (a bridge called CBR0). This gets forwarded to an interface on the Node that the Pod is running on. The Node’s network stack also has no route to the service network, so it sends the traffic to its own default gateway. En route to the Node’s default gateway the packets pass through the Nodes kernel, and this is where the magic happens…
We’ve mentioned a couple of things that we said we’d come back to. One of those was regarding how Service configuration is disseminated across the cluster, and the other was about Endpoints objects. Let’s circle back to these and find out what their roles are.
Every Kubernetes node runs a system service called kube-proxy. This is a Pod-based Kubernetes native app that implements a controller that watches the API Server for new Service objects and creates local iptables, or IPVS, rules that tell the Node to trap on packets destined for the service network and forward them to individual Pod IPs.
> Interestingly, kube-proxy is not a proxy in the normal sense of the term. All it does is create and manage iptables/IPVS rules. The name comes from the fact it used to run with a userspace proxy.
The configuration of every new Service, including its ClusterIP and list of healthy Pods form the Endpoints object, is sent to the kube-proxy process on every cluster Node. kube-proxy then creates the iptables, or IPVS, rules that tell the node to trap on packets being sent to the Service’s ClusterIP and forward them to individual Pod IPs from the Endpoints object list.
This means that every time a Nodes kernel processes a packet destined for the service network, a trap occurs and the packet headers are re-written so that the destination IP matches one from the list of healthy Pods matching the Service’s label selector.
> iptables was originally used for this but has been superseded by IPVS (stable since K8s 1.11). To cut a long story short, iptables is a packet filter and was never intended to be an L4 load-balancer. IPVS, on the other hand, is an L4 load-balancer that scales better and implements better load-balancing algorithms making it far better suited to this kind of work.
Putting it all together
That might be a lot to digest, so here’s a quick recap…
When a new Service is created it is allocated a virtual IP address called a ClusterIP. This is automatically registered against the name of the Service in the cluster’s internal DNS and relevant Endpoints objects (or Endpoints slices) are created to hold the list of healthy Pods with that the Service will load-balance to.
At the same time, all Nodes in the cluster are configured with the iptables/IPVS rules that listen for traffic to this ClusterIP and redirect it to real Pod IPs. The flow is summarised in the image below, though the ordering of some events might be slightly different..
When a Pod needs to connect to another Pod, it does this via a Service. It sends a query to the cluster DNS to resolve the name of the Service to its ClusterIP and then send traffic to the ClusterIP. This ClusterIP is on a special network called the Service network. However, there are no routes to the Service network, so the Pod sends traffic to its default gateway. This gets forwarded to an interface on the Node the Pod is running, and eventually the default gateway of the Node. As part of this operation, the Node’s kernel traps on the address and rewrites the destination IP field in the packet header so that it now goes to the IP of a healthy Pod.
This is summarised in the image below.
Last but not least… all Pods are on the same flat overlay network and routes exist to this network and the rest is simple.
Learning more…
If you liked this article, you’ll love my video courses and my book. My Kubernetes Deep Dive video course covers all of this and more, with lots of visuals and examples to watch and follow along with.
Peace!


One Response
Love the explanation !!. Thanks